Wednesday, January 24, 2018

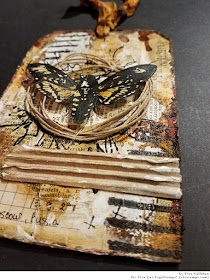
Drips and Distress Tag

Hello Again!

Today I want to share a fun tag I created using Viva Las Vegastamps to play along with the 

Simon Says Stamp Monday Challenge. The theme was "Tag it"

Join the Challenge HERE

 This also goes with the Mixed Media mood boards challenge(on Facebook)


My inspiration for this tag came from Dee Dee Catron (you really need to check out her YouTube) 
The video that inspired this background can be found HERE. I pretty much followed her technique with my own twist (and w/o the amazing transfer she did... **swoon**) 

Stamps Used: 
Deathhead Moth
Cross Marks Background
Scribble Circle
Row of distressed lines 3
(Or get the whole yummy art journaly plate HERE)

Other Products:
Distress collage medium, distress crayons, gesso, Wendy Vecchi crackle paste, yellow paint, Prima rusting pastes, Tim Holtz remnant rubs, micha pieces, string, Tim Holtz tiny attatcher, StaZon Ink, distress stains

You can see my step by step pictures below, but I HIGHLY encourage you check out that video, It totally inspired me!! 

What I started with...

After Collage

Rust medium added

Stamping and more layers...

Finished :D

(detail shots below)


Thank you for visiting!! 
stay inky!!


Sunday, January 21, 2018

Oops, *Insert Eye Roll*

Hello!


Today I want to share another quick post..
This time I have an art journal spread for the Stampotique Designers Challenge "Spots and Dots"


Sorry, I didn't think to take pictures as I went.  I've had a bit of a head cold, so my brain is a bit fuzzy. lol I made this last night while watching some "Mr. Robot" on Amazon. It's pretty good if you haven't watched it. (My Hubby recommended it to me). 

Anyhow, back to the Art Journal spread.  I created this in an altered travel planner (the small calendars for your purse).  I used:  Dylusions paints, distress paints, some clear gesso, distress collage medium to glue in my Stampotique images i colored and cut out, various markers, distress crayons, distress spray stains, Tim Holtz Layering stencils, and I'm sure some more (like I said my brain is a bit fuzzy an I just wanted to create, so everything within reach was fair game! lol) 

Stamps Used:
Smushasha (mermaid)
Phrase Cube 2 (oops qoute)
Wire Rings (behind mermaid)
Large Hand-Writing (I LOVE this stamp for texture in backgrounds!)

(<----to join the challenge yourself there is a link on the left of the blog )


Ok, that's all folks....
(the voice of porky the pig is stuck in my head now...lol)

Friday, January 19, 2018

Nature's Wonder Card

Hello crafty friends! :)

I hope you are all safe and warm!
Here in Ohio it has been super cold and snowy... 
I'm a warm weather person, so I'm dreaming of spring.

 As my first post back as part of the fabulous Viva Las Vegastamps design team, I want to share something special to me....

An easy 3D entomology themed card...
(great masculine card too!)


I myself collect pinned insects, and have a cabinet of curiosities.
  Do you collect anything?


STAMPS USED:

OTHER PRODUCTS:
Black and cream cardstock
Scrapbook paper
Black Season ink
Zig Clean color markers
Coard/string
Tim Holtz small talk stickers
Distress oxide ink -walnut stain
Tim Holtz tiny attacher
Distress collage medium (to stiffen the raised insect and to attach fun foam to card)
Fun foam cut to make 3d areas

Ok, so let's get started...

I started by stamping my stamp twice (one to cut for layering, and one for the base)
You can also see the slices of fun foam I cut to "pop" stuff up on


Next, cut your background layers from the scrapbook paper, and cardstock. My layers measure smallest to largest- 4.25 x 5.25in, 4.5in x 5.5in, card base- 6in x 10in


I used distress ink to add some depth on my stamped base, and my cream cardstock.  The insects were colored with my zig markers.

My layers were taped together with my VLVS miracle tape. Before taping my card base to my matts,  I used my tiny attacher to add my coard.


For the final 3d layer I used distress collage medium to glue my fun foam down. (And to add some thickness to the 3d bug).


I hope you have all enjoyed this card as much as I do.
 (Don't forget to comment what you collect! Just for fun :D )


Also, in case you missed this fun envelope I shared on facebook on Monday here is a bit more Buggy goodness...

STAMP USED:
Hercules Beetle
Paris Address

(the rest is all distress inks and stencils)

Tuesday, January 16, 2018

Swaperoo Week 2 Entry

Hello everyone!!

Today us just a quick post to share my second entry for the stampotique "swaperoo" swap all 3 stamps I used are by stampotique. 

This is an altered index card
(Background created with dylusions paints)


Thank you for visiting!!!


Wednesday, January 10, 2018

Things with Wings Postcard

Hello Friends! 


Today I have want to share a 4x6 in postcard that I created for the Stampotique Facebook Swap for this month...The theme is "wings"

Stamps Used:
Clothes text (Stampotique)
Floating (Stampotique)
Doodle Leaf (VLVS)
Reverse Image stamp (VLVS)

Other Products:
Distress Inks (regular and oxides):
 worn lipstick, picked raspberry, abandoned coral, ripe persimmon, spiced marmalade, carved pumpkin, fossilized amber, mustard seed

StazOn Ink- Black
Micron Markers,
White Gelly Roll pens
Zig Clean Color markers (various colors)
Wink of Stella -Glitter Clear
Scrap paper to create "masks"
Tim Holtz Layering stencils
Dylusions Stencil


I began by stamping all of my base images and masked them off.  After my base images were masked, I began layering my base inks. I used various distress inks, starting with the originals, and adding some oxides later. 


You can see the base layers building up here...


To add depth I like using stencils.  For this one, I started with distress layering stencils.  I also used one of the dylusions stencils. 


My favorite part is always removing the "masks" ...
Below is the reveal isn't it fun how it "pops" off the page?


For all of my coloring, I used Zig clean color markers. 
 I added my details with micron and gelly roll pens. 


I hope you enjoyed this mini post. I love how vibrant this came out :D 
If you have never joined the facebook Stampootique swaps you should definitely check them out!!!
They have one each month, lots of amazing artists!!! 

Swaperoo Postcard

Hello Friends! 


Today I have want to share a 4x6 in postcard that I created for the Stampotique Designers Challenge "Swaperoo" was the theme. You can check out the info HERE and join yourself!! :D 
(The basics are to switch bodies and heads...)


Stamps Used: 


Other Products:
Distress Oxide Inks: worn lipstick, picked raspberry, spiced marmalade, fossilized amber
grey ink (can't remember the brand)
Stazon Ink- Jet Black
Distress Ink Stains- Picket Fence 
Tim Holtz :small talk" stickers
Micron Markers,
White Gelly Roll pens
Zig Clean Color markers (various colors)
Wink of Stella -Glitter Clear
Blick Markers (various colors)
Scrap paper to create "masks"
Tim Holtz Layering stencils
Dylusions Stencil
Gold foil sticker tape (from an old swap)


Start with card stock cut to 4x6 in.  "Pretty Zara" was stamped first.  (I was careful to ink only the parts I wanted of the head and collar).  I then masked this part off with scarp paper.  I carefully stamped the Body of "angel squared" over this mask.  

Now that you have the base image,  you can begin building up the base and background. I chose pinks and yellows for this (colors listed above in supply lists) 


Once you have some base color added you can start adding background stamps and stencils.  I began with "circled lines". then added various layers of stenciling.  When I was satisfied with this I added some texture with "texture cube 1". You can do it in any order you choose. 

I also Added some white details with my gelly roller, and some black with my micron. 


Now, the best part.....
Take off the mask...
(I added my distress stain after removing the masks, but yo may choose to do it before)

Sorry I forgot to take a picture here...
I colored with various markers (zig and blick)

Finish everything off with a fun quote, and some gold foil. 


I hope you have been inspired to make a "swaperoo" of your own :D
Have a fantastic day!