Free background from VintageMadeForYou

Monday, December 19, 2016

Mail Art Monday Card Collection


Hello Again Everyone! 
Welcome back for another mail art Monday! 

today I wanted to share something a little different than my usual envelopes... Today I want to share a set of 3 cards that I made using my new circle stamp designs.

 The base idea for these cards was to use these circles as flowers. 
I hope you like these :D


Stamps Used:

Heart Pattern Circle by Tera Callihan 2 1/4 x 2 1/4


Wednesday, December 14, 2016

Holly Wally Mail Art Tutorial

Hello Everyone!!! 

Today I am here to share my first video tutorial for Stampotique Originals

for this weeks Designers Challenge

stamps linked below

(The theme is Christmas)

I hope you like this short video! 
(I ended up creating 2 envelopes with this same style, but different color schemes) 

(video)


Stamp Links:

Monday, December 12, 2016

Count Down to the New Year... Mail Art Monday

Hello World!!!
Welcome Back for another fun Mail Art Monday!!! 

Today I went with a Vintage/Victorian style...
I feel like these have a fun New Years vibe, especially with the clock! 


Stamps Used for these envelopes:

Pen Tips 2 3/4 x 2


To create these fun envelopes I stamped my main images and masked them off. I then stamped all of my background images. I used Tim Holtz distress ink in weathered wood for the background. Before removing the masks I also added a few flicks of black dylusions ink for added texture. 

After removing the masks, I used my zig clean color markers to color a bit of visual interest. 

Happy New Years to you all!! 


Wednesday, December 7, 2016

Holiday Door Hanger

Hello Again! 

Today I want to share a cute holiday door hanger I created for this weeks 

Stampotique Originals Designers Challenge 

Naughty or Nice

I wanted to create something fun that could double as a cute holiday decoration, so I decided to make a fun and easy door hanger ...
(Which I may have to share with my niece!)


To create this I stamped "Newton" on a piece of white card stock with memento ink in tuxedo black. I then used a variety of alcohol based markers to color him. I then cut him out and trace around his head with a pencil so that I could draw a Santa hat with a black marker (then colored and cut it out).

Next I created the little sign with a scrap of cardstock. 
(We want Santa to know we've been good this year, Right?!) 

To Finish Newton I glued on his hat and the sign in his hands. 

The base was created by cutting some polka dot scrap book paper, and a 2nd piece of black card stock to add a sturdier base. To create the hole for the door knob, I traced around one of my glue bottles then hand cut it...
 (my circle cutter was hiding, which I of course found right after cutting this!!)

Anyhow, I hope you like this little piece of Holiday fun, and I hope it inspires you to get creative!! 

I hope you all have a wonderful holiday!
(also I will have a special holiday envelope video tutorial to share with you for Stampotique on the 14th, so be sure to stop back!!)


Monday, November 21, 2016

Mail Art Monday Full of Joy (Video)


Hello Again Everyone!

I'm back with more
Viva Las VegaStamps goodness...

Today I want to share a fun and easy Mail Art Monday
Video tutorial with you for the holidays! 


(I did this in 2 parts for easy viewing)

Part 1 is the envelope design, and part 2 is for those of you whom want to see the coloring process.

(Part 1)

(Part 2)

Stamps Used: 


Wednesday, November 9, 2016

Stay Curious

Hello Everyone!!! 


Today I want to share some super fun inspiration with you. 

The 1st piece is a tag I created for this weeks Stampotique designers challenge, (animal head on human body).  You can check out the challenges and see more inspiration HERE

I love how this tag came out!  The colors are so rich and everything about it just makes me happy! 
the background was created with distress inks and a stencil. for the stamp coloring i used my Zig clean color brush markers, a white gel pen, microns (for added details), and a wink of stella glitter pen.

Stamps Used: 
Wolfie King (head and belt)
Fofe (body)


For my 2nd piece I want to share with you, this is an ATC i created for this months Stampotique swap on the facebook group! Feel free to join us, or just follow for inspiration!!! 

( This months theme is "circles" )

I used distress inks and stencils to create the background, and various markers to color Marsha

Stamps Used: 
stitching (from bo bunny)


Thank you for stopping by today! 
Stay inky! 

Monday, November 7, 2016

Fortune Favors the bold... Mail Art Monday

Hello Everyone!


Welcome back for another 

Mail Art Monday!! 


Today I want to share an envelope I created for one of my brothers.  Here in Ohio people are starting to get ready for deer hunting season.
I love the woodsy vibe of this one.  I wish the gold shimmer I added would show up in the pictures!
(they are the light colored blobs)


Stamps Used:

Deer Head by Cat Kerr 3 x 2 3/4


Thursday, October 27, 2016

Wish upon a star

Hello Everyone! 

Today I want to share some inspiration for this weeks 

The theme is outer space!
You can Join the challenge HERE or see some more inspiration...


I just love how this card came out! 
(it's A2 sized)

I created the background "space" layer with distress inks, dylusions sprays, and a gel pen. I used a variety of markers to color my stamps. Find these awesome Boys HERE

I also forgot to share my Halloween piece from last week here, so I'm going to share it today.  You can still join with Halloween themed until the end of the month too!!


These spooky tags were a ton of fun! 

I hope you all enjoy!!!

Have a spooky rest of October, and stay crafty! 


Monday, October 17, 2016

Mail Art Monday Spooktacular


Hello Everyone! 

Welcome back to another fun Mail Art Monday! 

Today, I want to share a super fun and easy envelope just in time for Halloween. 


To create this envelope, I started with an A2 envelope.  I started by stamping the Skeletons in the closet stamp.  I next used a ruler to continue the line for the "base board" to create a floor. 

Next, I stamped the spider and web in the upper right corner. I used my micron marker in .005 to create the cracks in the "wall".

To color everything I used a variety of zig clean color brush pens. and distress inks to add a bit of shading around the edges. 


Wednesday, September 28, 2016

Be Different

Hello Again Everyone! 

Today I want to share a postcard I made for the Stampotique Designers challenge. 


The theme is favorite quote... Now, I'm not sure I have a favorite quote, or at least nothing comes to mind at the moment, so this is a saying that I happen to like... 

(If you know outside of the craft world than you know I'm my own variety of unique... lol) 


The background was created by using my dylusions paints and brayer to add the colors on. After I cut this piece down to postcard size, I used my texture cube to add a few background stamps. 

I knew I wanted to use Buru (he's a total fave. <3 ) so I used washi tape to give him a little place to sit. After looking at the postcard, I knew i needed to add a little more spice, so I added the fun banner too!  The saying I added is from one of the Tim Holtz small talk sticker packs.  

Stamp Links:
Buru
Texture cube
Banner


Tuesday, September 20, 2016

Greetings from Banksy!

Hello World! 

Today I want to share some quick and easy any occasion cards I created using some of the Banksy stamps by Viva Las Vegastamps, on my ever growing stack of gelli prints. 

(if you are like me you probably have a stack or some master boards lying around... so grab some and cut those bad boys up!!!)

 ... If you don't have any, then grab a brayer or sponge dobber and slap some paint on some cardstock for bases.. lol (thats basically what my bear card is) ...


The reason I love Banksy stamps on these is because they are so bold they will show up on busy backgrounds, or shine on simple ones too! Basically you can't go wrong!! 

(stamps used listed at the bottom) 


I also used some crayola slick sticks and Tim Holtz distress crayons for some extra shading and the circle doodles. For some added grunge I flicked black dylusions sprays randomly also... the black marker is micron for the extra doodles. 

Stamps Used: 
Plate 1482 (you save $ if you buy as a plate)
Banksy Love Bug
I See Humans
Banksy Circus Bear
Banksy Eat the Rich


Thank you for visiting!
I hope you've enjoyed these fun off the wall greetings! 
(I need to make more so I can use up my growing gelli print stack!)


Wednesday, September 7, 2016

Wild Wednesday Mail Art!

Hello Everyone!!! 

&

Happy Hump day! 

Today I want to share a piece of mail art I created for this weeks mail art challenge theme for Stampotique Originals. 

(check us out for more inspiration HERE)


you can add a project for this challenge HERE(or just check out some more inspiration)


To start I made a 6x6 envelope on my envelope punch board. I stamped the adorable "FoFe" on the left side then found a scrap to create a mask for my address block. I also masked off "Fofe". 
(sorry I forgot to take a picture of the beginning stage)

(stamp links at bottom)

Next I inked my background with distress inks: cracked pistachio, lucky clover, and twisted citron. 
(yes its scary at this point... and going to get scarier! ) 


Ok, now I stamped all of my background stamps in the same greens I used for the base colors. For the black images I used black archival ink. 
(see looks scarier ... but don't panic) 


Ok, now I removed my masks so I can begin to color. I colored this piece with the zig clean color brush markers. You can see the green I used on the hearts below


Once everything is colored I added some white ink and gel pens to help everything pop. 
I also added some water spots for more visual interest. 


I hope you Enjoyed this piece, and I hope it inspires you to join us! 

Stamps Used: 


Monday, September 5, 2016

Celebrate it's Mail Art Monday!

Hello Again! 

(and Happy Labor Day to those of you in the USA) 

Today I'm here again with another fun piece of mail art for VLVS to share with you! 


For the step by step make sure you watch the short video 

(and please let me know if you like this new video format or if you prefer the older method of me talking and showing everything even though they are longer)


Stamps Used: 

Banksy Girl Floating With Balloons 1 1/2 x 3 1/2


Thank you for visiting!! 
Stay inky and have a great week! 


Wednesday, August 17, 2016

Hold on to your dreams!

Hello Again!! 

Are you ready for some new Stampotique weekly inspiration?!?! 

This one is a super fun piece... I love polka dots, and who doesn't love using text for backgrounds so, I had to jump in n this one to create a super fun card!!  

I loved the idea of combining both of this months challenges, and I love how it came out


I hope you enjoy it as much as I do!

To start I stamped out the "Little Hoo-Hoo" stamp on a piece of card stock where I colored him and cut him out. (He was colored using zig cleancolor brush markers.)

*Its ok  if you mess up a tad coloring few people will notice... but I took a close up (below) so you can see below I do mess up, and just go with the flow... 


For my text background I started with a piece of scrapbook paper (it was a pale tan-ish color originally).  I inked it with various Tim Holtz distress inks in yellow and oranges.  I used two different stencils to add the polka dot pattern randomly around the card base. 

once I was satisfied with that I added black around the edges of the card base with a marker.  I also chose to add my sentiment at this time (from the Tim Holtz chit chat stickers), and inked around them in black with a pen. 


Last I just glued everything together. 

I hope you like this as much as I have enjoyed making it! I so love these little monster stamps from Kira Nichols!!! 

(I think I NEED them all!!!)

Don't forget to hop over to our challenge and Join us!!!


Monday, August 15, 2016

Wonderland Mail Art Monday!

Hello again!

Today I'm here with another fun Mail Art Monday...


Today I want to share some fun wonderland themed mail art (with a touch of Halloween inspiration).


To start I stamped Tweedledee and Tweedledum, as well as the 3 triangles. Then I masked them off. I also masked off the address box.

Next I layered purple distress inks over the whole background. I used punchenella waste as a stencil to add extra depth.  Before removing the masks, I flicked water over the envelope to add a touch of additional depth.

Once the water spots dried, I removed all of the masks. I added the wonderland and plus sign stamp to add extra details to the envelope.

To finish everything I used the zig clean color markers to color everything off.

Stamps Used: 


TweedleDum And TweedleDee 2 3/4 x 3


Thursday, August 4, 2016

Day Dreaming of Paradise

Hello Friends! 

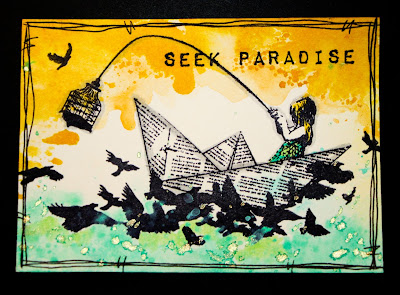
Today I am here to share a pair of really fun ATC's

 (Artist Trading Cards) with you! 

For those of you whom know me personally, you know I am a dreamer...

I love the ocean, and my head is always in the clouds dreaming up ideas...
So this new stamp from VLVS spoke to my heart from the moment that I saw it!!! 


To create these ATC's I used the wrinkle free distress technique carefully building up each layer of color... I stamped my images in black archival ink and used a black ink pen to draw my boarder.  I also added a few flicks of some glimmer mist to give it that extra dreamy feel!


I can tell this little girl is a dreamer too!! 
(And Who doesn't Love Banksy!?!)


Stamps Used:    

Seek Paradise 3/4 x 2 1/4


Thank you for stopping in to dream with me today!
I hope you find yourself dreaming of your paradise too! 


Wednesday, July 27, 2016

Take me to the Sea!

 Hello Everyone!!! 

I hope you are all well!
Today I want to share  two of my favorite things with you....


Mail Art and the ocean...

 now combined for this weeks challenge!!!! 

This envelope was created for the Stampotique Originals Ocean/beach theme ! 
I hope it inspires you and I hope you will hop over and join us!!  

(HERE for inspiration)

(linkz up page is HERE)

To start I stamped my images on an A2 envelope, 
(stamp links below) then I immediately masked them off so that I could ad all of my background color

(you can see it with the masks still on here)

Next remove the masks to reveal what you have to work with 

Next I colored everything with the markers shown below
(Zig clean color brush tip) 
(this is also the ink i used for my background)

To finish everything off I splashed a few drops of water on the envelope to add the spots you see below :)  (this is one of my favorite techniques!) 


Thank you for visiting! 
Now get Inky!!!